VuePress 个人博客美化:vuepress-theme-reco 主题使用
本文主要介绍如何使用 vuepress-theme-reco 主题美化个人博客,以及评论、子侧边栏、图标和插件等扩展功能的使用。
VuePress 官方文档 (opens new window) 、vuepress-theme-reco 官方文档 (opens new window)
# 前言
本人在使用 VuePress 默认主题搭建博客的过程中,对侧边栏的样式一直不太满意,于是开始寻找其他可替代的主题,然后发现了 vuepress-theme-reco。该主题不仅继承了 VuePress 默认主题几乎一切的功能,还提供了其他扩展功能,不仅满足了我的需求,而且几乎无需修改现有博客内容就可以无缝切换到该主题。到目前为止,使用过程中基本满足了我所有的需求。
尽管官方文档中大部分功能的描述十分详细,但是在一些功能使用的过程中也费了些力气,因此在此记录下来。
# 项目目录
—— blog
  |—— docs
      |—— .vuepress		// 配置目录
      	  |—— public	// 静态资源
      	  |—— styles	// 样式
      	  |—— config.js		// 配置文件
      	  |—— enhanceApp.js	// 客户端应用增强文件
      |—— books		// 书籍模块
      |—— docker	// docker 模块
      |—— README.md		// 博客首页
2
3
4
5
6
7
8
9
10
# 使用主题
- 安装依赖
npm install vuepress-theme-reco --save-dev
- 应用主题,在 config.js 文件中添加如下配置。
module.exports = {
  theme: 'reco'
}
2
3
# 全局配置
config.js 是项目的全局配置文件,可以配置网站的基本信息、插件、主题、导航栏和侧边栏等内容。
// 完整的 config.js 文件内容,可根据需要自行删减
module.exports = {
  // 语言
  locales: {
    '/': {
      lang: 'zh-CN'
    }
  },
  theme: 'reco',
  title: 'Cleaner',
  description: 'Cleaner\'s blog',
  head: [
    ['link', { rel: 'icon', href: '/favicon.ico' }],
    // 主题 移动端优化
    ['meta', { name: 'viewport', content: 'width=device-width,initial-scale=1,user-scalable=no' }]
  ],
  base: '/',
  markdown: {
    lineNumbers: true // 代码块显示行号
  },
  plugins: [
    ['@vuepress-reco/vuepress-plugin-back-to-top']
  ],
  themeConfig: {
    // 主题模式 博客模式
    type: 'blog',
    autohor: 'Cleaner',
    // 个人信息的头像
    authorAvatar: '/avator.jpg',
    // 内置搜索
    search: true,
    searchMaxSuggestions: 10,
    // 子侧边栏
    subSidebar: 'auto',
    sidebarDepth: 1,
    lastUpdated: '更新时间',
    // 设置时区偏移量(8小时)
    timezoneOffset: 8 * 60 * 60 * 1000,
    // 博客配置
    blogConfig: {
      socialLinks: [
        {icon: 'reco-github', link: 'https://github.com/SongJian-99'}
      ]
    },
    // 导航栏配置
    nav: [
      { text: 'Docker', link: '/docker/preface', icon: 'iconfont icon-docker' },
      { text: '书籍', link: '/books/bookList', icon: 'reco-document' },
      { text: '时间轴', link: '/timeLine/', icon: 'reco-date' },
    ],
    sidebar: {
      '/books/': [
        {
          title: '传统文化',
          collapsable: true,
          children: [
            { title: '素书', path: '/books/素书' },
          ]
        }
      ],
      '/docker/': [
        {
          title: 'Docker 应用',
          collapsable: true,
          children: [
            { title: '使用 Docker Compose 部署 Elasticsearch + Kibana', path: '/docker/Elasticsearch' },
            { title: '使用 Dockerfile + Docker Compose 部署 Web 项目', path: '/docker/Web' }
          ]
        }
      ]
    },
    // 评论插件配置
    valineConfig: {
      appId: '替换为自己的appId',
      appKey: '替换为自己的appKey',
      showComment: false
      // isShowComments: true  在需要添加评论的页面加上这个配置
    }
  }
};
2
3
4
5
6
7
8
9
10
11
12
13
14
15
16
17
18
19
20
21
22
23
24
25
26
27
28
29
30
31
32
33
34
35
36
37
38
39
40
41
42
43
44
45
46
47
48
49
50
51
52
53
54
55
56
57
58
59
60
61
62
63
64
65
66
67
68
69
70
71
72
73
74
75
76
77
78
79
80
# 首页配置
主题支持两种风格的首页,一种是偏文档式的首页(默认),另一种是博客式的首页。本文介绍博客风格首页的配置。
- 在 config.js 中新增配置
module.exports = {
  theme: 'reco',
  themeConfig: {
    type: 'blog'
  }
}
2
3
4
5
6
- 在 README.md 文件中配置首页展示的内容。
<!-- README.md 文件内容 -->
---
home: true
title: 首页
author: Cleaner
heroText: null  # 禁用标题
tagline: null   # 禁用副标题
heroImage: /logo.jpg
heroImageStyle: {
  maxWidth: '450px',
  display: block,
  margin: '-12rem auto 1.5rem',
  boxShadow: '0 5px 18px rgba(0,0,0,0.2)'
}
---
2
3
4
5
6
7
8
9
10
11
12
13
14
15
# Front Matter
放在文章中的第一部分,在 Front Matter 中可以配置文章的标题、时间、分类和标签等信息。更多配置可以参考官方文档 (opens new window)。
---
title: 使用 Dockerfile + Docker Compose 部署 Web 项目
date: 2023-06-06
isShowComments: true	# 展示评论
categories: 	# 分类
 - 后端
tags: 		# 标签
 - Docker
---
2
3
4
5
6
7
8
9
# 添加 iconfont 图标
主题中已经内置了一些常用的图标,但有时不能完全满足我们的需要。主题支持使用 iconfont 图标,可以方便地集成 iconfont 来满足个性化的图标需求。
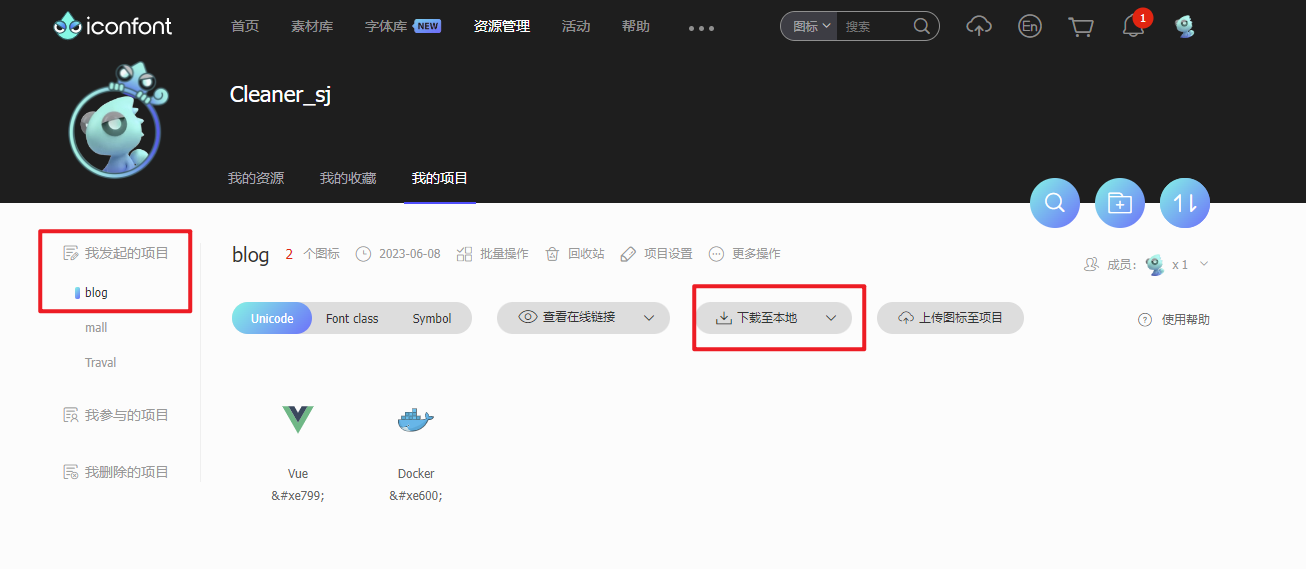
- 在 iconfont 官网 (opens new window)中选择所需的图标,并添加到项目中。在项目页面,点击下载至本地,将下载的文件夹中的 iconfont.css、iconfont.woff2、iconfont.woff、iconfont.ttf 四个文件复制到 styles 目录下。
- 在 enhanceApp.js 文件中引入 iconfont.css 文件。
// enhanceApp.js 文件内容
import '../.vuepress/styles/iconfont.css'
2
// iconfont.css 文件内容
@font-face {
  font-family: 'iconfont';  /* Project id 4106829 */
  src: url('iconfont.woff2?t=1686190078548') format('woff2'),
        url('iconfont.woff?t=1686190078548') format('woff'),
        url('iconfont.ttf?t=1686190078548') format('truetype');
}

.iconfont {
  font-family: "iconfont" !important;
  font-size: 16px;
  font-style: normal;
  -webkit-font-smoothing: antialiased;
  -moz-osx-font-smoothing: grayscale;
}
// 图标
.icon-docker:before{
  content: "\e600";
}
// 图标
.icon-vue:before {
  content: "\e799";
}
2
3
4
5
6
7
8
9
10
11
12
13
14
15
16
17
18
19
20
21
22
23
- 在导航栏中使用
{ text: 'Docker', link: '/docker/preface', icon: 'iconfont icon-docker' }
# 定制样式
在 styles 目录下新增 index.styl 文件,可以在该文件中修改主题的默认样式,定制自己想要的效果。更多配置可以参考该文档 (opens new window)。
// index.styl 文件内容
.content {
  font-size 30px
}

// 首页标签列表样式
.abstract-item {
  background-color: #acdcfd3d !important;
  transition: all .5s;
}
.abstract-item:hover {
    transform:  scale(1.02);
    transition: all .5s;
}
2
3
4
5
6
7
8
9
10
11
12
13
14
# 插件
除了官方提供的插件,插件广场中又提供了许多实用的插件,大家可以自行探索使用。
插件配置好后,一定要重新启动项目(热更新都是泪啊)。
# back-to-top
回到顶部小火箭插件
- 安装
npm install -D @vuepress/plugin-back-to-top
- 使用
module.exports = {
	['@vuepress-reco/vuepress-plugin-back-to-top']
}
2
3
# commonts
主题中已经内置了评论插件,并且提供了两种评论系统供我们选择:Valine 和 Vssue。Valine 是一款基于 LeanCloud (opens new window) 的快速、简洁且高效的无后端评论系统,Vssue 是 Vue 驱动的、基于 Issue 的评论插件,两种评论系统各有各的优势。因为 Valine 支持展示文章的访问量,因此我选择了 Valine。
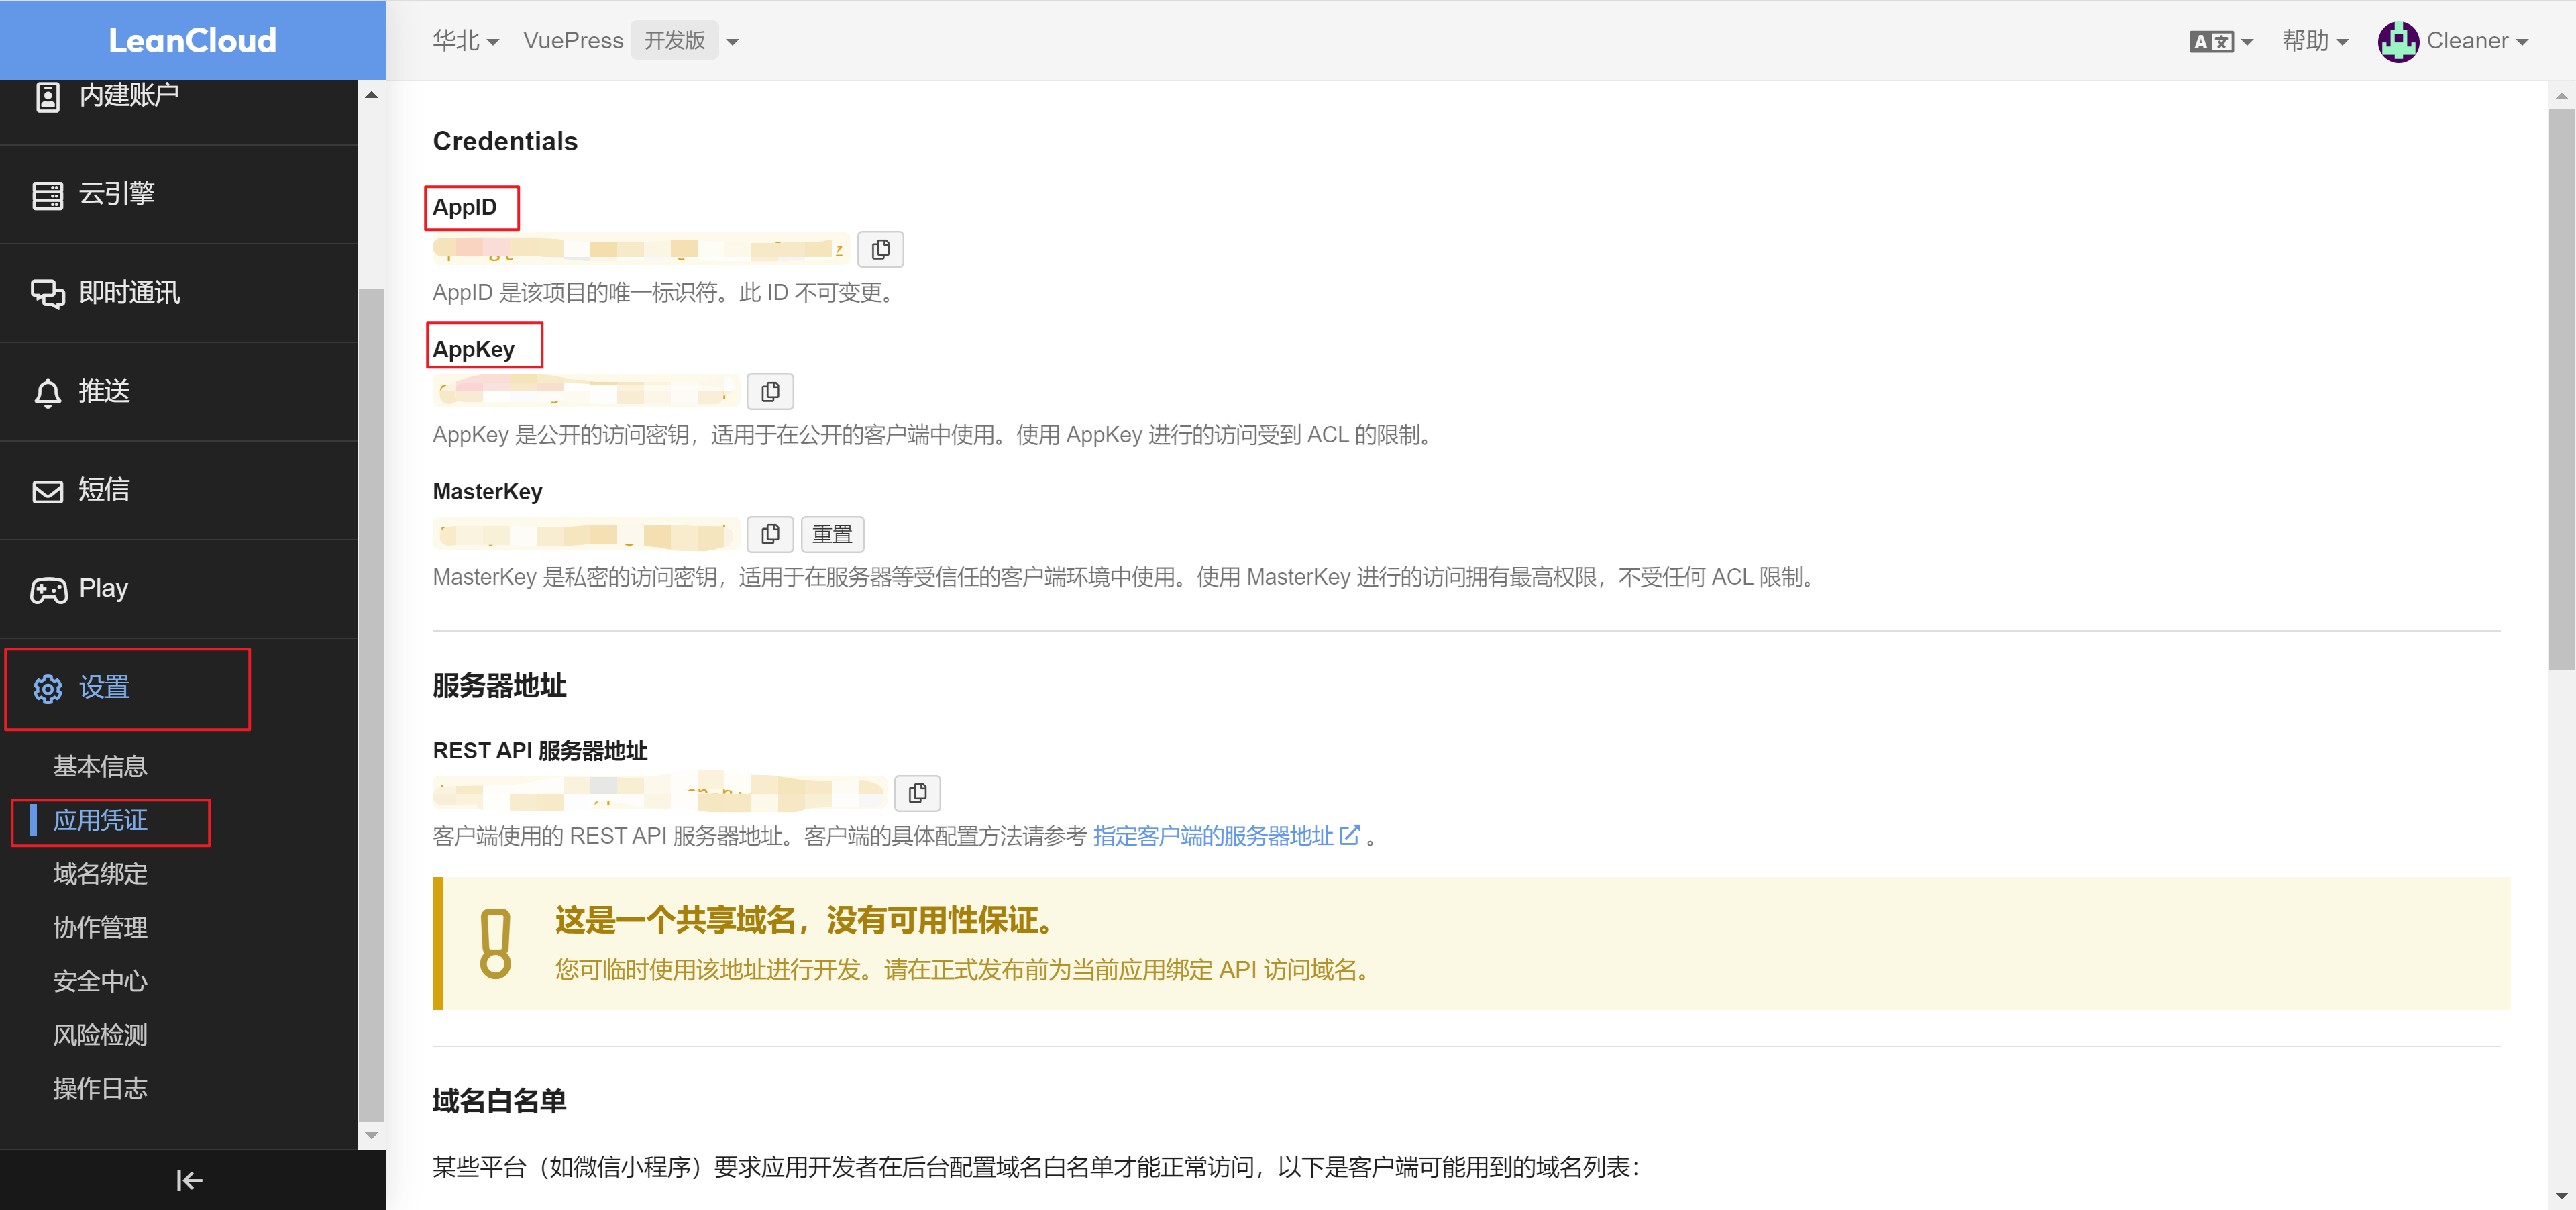
- 使用 Valine 需要先获取 AppId 和 AppKey。访问 LeanCloud (opens new window) 网站,进行注册登陆。登陆后进入到控制台页面,创建一个新应用,创建成功后,进入创建的应用中,在 设置->应用凭证 选项卡中,就可以看到 AppId 和 AppKey 了。
- 在 config.js 文件中添加如下配置
// 评论插件配置
valineConfig: {
    appId: '替换为自己的appId',
    appKey: '替换为自己的appKey',
    showComment: false
    // isShowComments: true  在需要添加评论的页面加上这个配置
}
2
3
4
5
6
7
# pagination
分页插件,实现首页内容分页展示效果。
- 安装
npm install -D @vuepress-reco/vuepress-plugin-pagation
- 使用
module.exports = {
	plugins: [
  		['@vuepress-reco/vuepress-plugin-pagation', {
      		perPage: 5	// 每页展示条数
    	}]
    ]
}
2
3
4
5
6
7
# PWA
内容刷新弹窗插件。网站有内容更新时会出现弹窗,并提供了一个刷新按钮,方便用户查看网站最新内容。
- 安装
npm install -D @vuepress/plugin-pwa
- 使用
module.exports = {
	plugins: [
  		['@vuepress/pwa', {
          serviceWorker: true,
          updatePopup: {
              message: "发现新内容可用",
              buttonText: "刷新"
      	  }
    	}]
    ]
}
2
3
4
5
6
7
8
9
10
11
# copy
代码复制弹窗插件,提升复制代码体验。
- 安装
npm install -D vuepress-plugin-nuggets-style-copy
- 使用
module.exports = {
  plugins: [
      ["vuepress-plugin-nuggets-style-copy", {
        copyText: "copy",
        tip: {
          content: "复制成功!"
        }
    	}]
    ]
}
2
3
4
5
6
7
8
9
10
- 注意:如果你使用该插件时出现报错,请看文末问题一节。
# sitemap
网站地图,提升网站的可见性和排名。
- 安装
npm install vuepress-plugin-sitemap
- 使用。注意 sitemap 插件和 last updated 插件时间对象冲突,会产生报错。
module.exports = {
  plugins: [
    	// 解决 sitemap 报错问题
    	['@vuepress/last-updated', {
      	transformer: timestamp => {
        	return new Date(timestamp).toISOString()
      	}
    	}],
  		['vuepress-plugin-sitemap', {
      	hostname: 'https://cleaner.love/'
    	}]
  	]
}
2
3
4
5
6
7
8
9
10
11
12
13
# 问题
copy 插件报错:本项目 Node.js 版本为 14.18.0,插件可以正常安装,但是项目启动后,该插件会报错。通过查看错误信息,定位是插件中的 copy.vue 文件出现错误。目前是通过打补丁修改插件源码的方式来解决报错的问题,解决过程如下。(参考文档 (opens new window))
- 安装依赖
yarn add patch-package postinstall-postinstall -D
- 修改 /node_module/vuepress-plugin-nuggets-style-copy/copy.vue 文件。
// copy.vue 源码
if (visibleTip) {
	this.$message({
    time,
    content,
    title
	});
}
2
3
4
5
6
7
8
// copy.vue 修改后的代码
if (visibleTip) {
	this.$message({
    time:time,
    content:content,
    title:title
	});
}
2
3
4
5
6
7
8
- 生成修改文件,命令运行成功后,项目中会新增 patches 目录
npx patch-package lodash
- 修改 package.json 文件,在 scirpts 下新增如下配置。
"scripts": {
	"postinstall": "patch-package"
}
2
3
- 删除 node_modules 文件夹,重新 install 下载依赖。下载完成后,插件源码已经变为我们修改过的代码,然后启动项目即可正常使用该插件。
# 末尾
本文介绍了主题的大部分功能,更多功能在本人后续的使用过程中慢慢探索,然后也会同步更新该篇文章。